I love to recreate restaurant dishes at home. It’s no secret. I did it with my knock off Chick-Fil-A Chicken Nuggets, IHOP pancakes, Butter Beer, and Monterrey Chicken from Chili’s.
Years ago when we lived in Utah, we often ate at an sushi joint and I discovered this Fuji Chicken on the menu. Oh boy did I crave it! And now that we’ve moved away, I crave it even more.
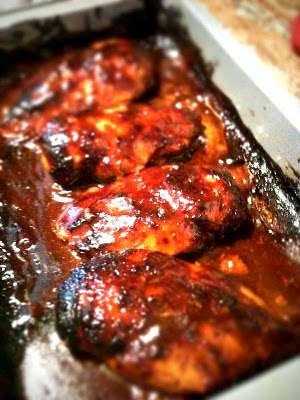
The chicken is coated in Panko crumbs so it’s super crunchy. And the sauce…Oh the sauce! I had to limit myself when I took the pictures below so you could actually see the dish. I usually drown that crunchy chicken and rice in it!

As usual, feel free to switch up the veggies with what your family likes and will eat. We really like the combination of snap peas and carrots because of their crispness and fresh taste.

Fuji Chicken
Printable Version
Serves 4
Ingredients
4 chicken breasts
1/2 cup all purpose flour
2 eggs
2 tsp milk
2 cups panko crumbs
1 1/2 cups matchstick carrots
2 1/2 cups snap peas, cut in half
4 cups cooked white or brown rice
Oil for cooking
For Sauce:
1 cup soy sauce*
2 TBSP water
2 TBSP brown sugar
1/2 tsp ground ginger
1 TBSP corn starch
1 medium Fuji or Granny Smith apple, peeled and cut into matchsticks
Directions
1. Preheat
oven to 350 degrees. Place one chicken breast into a gallon size zip
top bag and using a heavy mallet, pound thin until even thickness.
Repeat with all the chicken. Set aside.
2. In 3 medium
bowls place flour in one, eggs and milk in one (whisk together) and
panko crumbs in one. Dredge chicken in flour and shake off any excess.
Dip into egg mixture then coat in panko crumbs.
3. In a
large oven proof skillet over medium high heat, heat 1 TBSP oil. Gently
place chicken into pan and brown on one side for about 2-3 minutes.
Flip chicken over and place into the preheated oven. If you don’t have
an oven proof skillet/pan, transfer chicken to a baking sheet. Continue
to cook until chicken is cooked and no longer pink in the middle.
About 15-20 minutes.
4. While chicken is cooking, in a
medium pot combine soy sauce, water, brown sugar, ginger, corn starch
and apple. Whisking constantly, bring to a boil and boil for 1 minute.
Turn heat down and simmer for 5 minutes. If your sauce gets too thick
add a little more water. If it’s still too thin, add in a little
cornstarch.
5. In the same pan you cooked the chicken in, saute carrots and snap peas in about 2 tsp oil until just tender.
6. Slice chicken into strips and serve over cooked rice and vegetables. Pour sauce over and serve.
*I like to use low sodium soy sauce.
This recipe is linked up – Lovely Little Link Party, The Weekend Re-Treat, Best Recipes & DIY Projects,