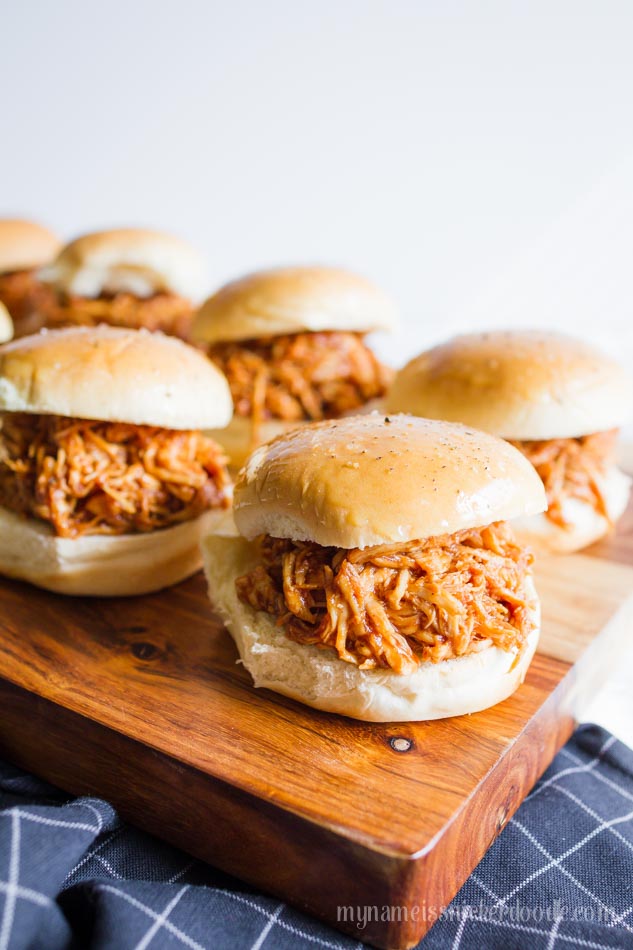
Monday, January 30, 2012

Inspiration

Inspiration comes in all forms and ways. Now, when it comes to doing something crafty, I always think of my best ideas while I am laying in bed about to fall asleep. Or when it comes to something of real importance, like enriching someone else's life with selfless service, a thoughtful note or even just an "out of the blue" hug, that inspiration comes to me in a flash while I am doing some simple task during the day. However it comes, I am one to try to NOT ignore inspiration because I believe that true inspiration comes from God.

My friend/family (more family than friend), Rachel, was inspired to start a blog featuring her family and adoption. I know that there are probably thousands out there with a similar purpose so, that's why I am featuring her blog here. With all of you, my fabulous readers, there is bound to be someone or someone who knows someone, who is need of a family for their unborn child.

I've known Rachel for more than 15 years and she has always been someone I've looked up to. I truly could go on and on about how kind, generous and loving she is, but I want you to read for yourself more about her family at Our Circle Isn't Complete and hopefully you will be inspired.

Friday, January 27, 2012

Watch Me In Action!


In honor of Fabulous Food Friday...a cooking video!
This is still crazy to watch!
I can't believe what I've been able to do over the last 6 months!
I truly enjoyed filming this video (another one to come soon)
and it's just might be a hint of what's to come
to my site later this year!


To watch some other videos with my favorite girls watch...
Shrimp and Broccoli Fettucini
Cream Chicken Pesto &Bowtie Pasta
Baked Penne

Fabulous Food Friday #112

I don't think I need a story to go along with this recipe...I'm pretty sure it speaks for itself! I came up with it on the spot and it turned out FABULOUS! I do have to say that it was my dad who inspired me to make the French toast, but I went a little overboard by adding all of the extras! *Make your banana bread ahead of time and allow it to cool completely. (And the recipe with the longest name goes too...)

Banana Bread French Toast
Printable Version
Pin It

Banana Bread Loaf (see my recipe below or use your favorite recipe)
3 Eggs
3/4 cup milk
1/2 tsp cinnamon
butter
*Philadelphia Indulgence Dark Chocolate (a chocolate cream cheese spread) or chocolate chips
Caramel Sauce (I used Mrs. Richardson's)
Powdered Sugar for sprinkling

Preheat a skillet over medium heat. In a shallow dish whisk together eggs, milk and cinnamon. Slice your banana bread loaf into 1 1/2-2 inch slices (about 8 slices total). Place about 1 tsp butter in skillet and melt. Dip one slice at a time into egg mixture and place onto hot skillet. Cook a few at a time with about 2-3 minutes on each side. Repeat until all slices are cooked.
Place one toast onto a plate and spread a thin layer of Chocolate Indulgence on top. Place another toast over that, sprinkle with powdered sugar and top with warm caramel sauce. Serve hot!

Breakfast or dessert...you decide!

*See more about Philadelphia Indulgence here.


Banana Bread
Printable Version
1/2 cup butter
1 cup sugar
2 eggs
1 tsp vanilla
1 1/2 cups flour
1 tsp baking soda
1/2 tsp salt
1/2 cup sour cream
1 cup mashed bananas (about two medium bananas)

Sift flour, soda, and salt together in a bowl and set aside. In a large bowl cream together margarine and sugar. Stir in vanilla and beat in eggs. Add flour mixture and sour cream alternately. Mix well. Stir in bananas until well combined. Pour batter into a lightly sprayed loaf pan. Bake at 350° for 40-50 minutes or until center is set and cooked through. Cool completely.

The 36th Avenue

Wednesday, January 25, 2012

Looking Forward

Today I'm looking forward to...
*Getting my room cleaned out. Most of my scrapbook stuff is in there and it's time to purge.
*Making a chocolate cream pie, just because.
*Creating a chore chart for Liam. He's even looking forward to it.
*Playing with my brand new iPhone 4S phone that Ian bought for me! It's the fanciest phone and I love it!

In the Springtime I'm looking forward to...
*Our little boy to arrive! I had my dr. appointment yesterday and everything is looking great! I'm starting to get to the uncomfortable stage so, labor and delivery day can't come fast enough.
*Spring also brings my birthday and I'm always excited to celebrate that day!


In the Future I'm looking forward to...
*Liam going to school in the fall...actually I have mixed feelings about this one and find myself tearing up at the thought, but I am very excited that he will get daily adventures at school.
*They are turning my favorite book into a movie! Austenland is due out later this year and I am super excited! I said from the beginning that it would make a fabulous movie!
*This is actually going to be quite the year for us, but most of it is still in the works so I'll keep it to myself for now. 2012 is definitely going to be a great growing year for us for sure!

{What things are you looking forward to?}

Monday, January 23, 2012

My Heart Strings (How To)

Today I put up some of my Valentine's decorations that I almost forgot about. I got a huge smile on my face when I pulled out the bag of felt hearts that I sewed a few years ago and then added some fun felt conversational hearts to the year after. I've got them in a fun clear candy jar.

I also got a little sentimental when I pulled out this felt heart wreath. I'm sure each and every one of you have this hanging in your home. It was the first project that I did where I found the idea off a blog.

As for these "heart strings" I actually made these last year, but I was so busy with a new born and all the sickness that was going around, I never got around to taking a picture.


They're back up this year and I just love them. It cost me $0.00 to make because I used random scrap paper I had on hand! You can make them to the length you need them or sew them horizontally and make a banner of sorts. Whatever you come up, I hope you love and enjoy them for years to come!


Heart Strings How To
Pin It
Supplies...
Double Sided Patterned Paper, News Paper, Vellum...whatever you have on hand
Scissors
Heart Punch (Optional)
Thread (I used white because I always have it on hand)
Sewing Machine

1. Cut or punch hearts out of paper. I hand cut all of my hearts (because I don't have a heart punch and I wanted each of my hearts to be unique in size and look). If you aren't a wacky person like me feel free to punch or die cut hearts. I have five strings total with about 14-17 hearts on each.

2. Thread your sewing machine and set it to a long straight stitch with medium tension.

3. Holding on to both thread, start running your stitch while lightly pulling it out, starting your "string".

4. Without lifting the foot, place one heart down and stitch down the middle.

5. Run the stitch about 1 1/2 inches and then stitch in another heart. And so on. Once you get going you'll find your rhythm.

I've just pinned them to my ceiling using clear pushpins.

The 36th Avenue


Friday, January 20, 2012

Fabulous Food Friday #111

I don't even know how to express what joy and glee I've felt from this one recipe. Not because it's so delicious (because it truly is), but from the response I've gotten from posting it last year.

It's my Sweet Chicky Nugget recipe! Pinterest and Pinterest users like me (who are highly addicted and loving every minute of it) have brought this recipe to life with a click of a button.

So yes, today I am reposting this infamous recipe, but I'm going to answer a lot of the questions that I've gotten in comments and emails about it.

*Can I bake these instead of fry them?
I've never baked them myself, but a few of my readers have and were not happy with the results. If you have baked them and liked how they turned out, I would love it if you would share with us what you did. I know that frying them is not so healthy, but the trick with frying is getting your oil to the right temperature. You don't want it too high or else you will burn the outside leaving the inside uncooked. And if your oil is too low in heat, all your chicken will do is soak up that oil leaving you with a greasy mess. As for all the splattering some of you are concerned with...make sure your pot is deep enough to hold about 2 inches of oil plus plenty of room at the top where it's not bubbling over. Plus wearing a cute apron seams to help not getting it on your clothes!

*Can I substitute some of the ingredients for a more healthy or gluten free version?
Again, I've never done this, BUT many of my readers have tried this and have had great results. Some substitutions might be egg beaters, almond milk or Silk, gluten free flour, wheat flour, Stevia. This being said, it will alter the taste from the original recipe and might not taste similar to the "Not Cow Place".

*Pickle juice, pickle juice, pickle juice?!?!
So many of you have commented that you've heard the nuggets are marinated in pickle juice. Well, I consulted one of my best friends, Julie, about this mystery. When she and her husband were first married, they traveled around to multiple Chick-fil-as to bring up their sales, help out with management and get the store up and running to Chick-fil-a standards again. Here's the scoop...the nuggets are NOT marinated in pickle juice. BUT, the strips are marinated in dill pickle juice. And not for long 20-30 minutes. She also informed me that the chicken for the nuggets that is delivered to the store is already seasoned. They just dip the nuggets into an egg/milk wash then into their dry mixture (which is also pre-mixed and shipped). So, they do not marinate their chicken the egg/milk mixture. I like to do it because I feel it makes them completely tender.

*Is the peanut oil really important?
I know that peanut oil is really expensive. I've bought a little bottle of it purely for this recipe and it was definitely worth it. HOWEVER...these nuggets are just as good fried in canola or vegetable oil. One reader tried using coconut oil and said they didn't get brown at all. The reason for canola or vegetable oils is they have a higher burn factor hence getting food light to golden brown.

I just wanted to thank you for the hundreds of thousands hits (literally) to my blog now. Cooking is one of my passions as well as crafting so, I am so excited where I'm taking my site to this year! I hope you enjoy it, too!

Sweet Chicky Nuggets
Printable Version
Pin It
2 skinless and boneless chicken breasts
1 cup milk
1 egg
1 1/4 cups flour
2 TBSP powdered sugar
2 tsp salt
1 tsp pepper
peanut oil (is best) or canola oil

In a medium bowl whisk the egg and stir in the milk. Trim any fat away from chicken. Cube chicken into bite size pieces. Place chicken in milk mixture,and cover. Let it 'marinate' for 2-4 hours in the fridge. This will make the chicken very nice and tender. In a gallon size resealable baggie combine flour, powdered sugar, salt and pepper. Seal and shake to combine. Place about 2 inches of oil in a medium deep pot. Over medium high heat (more towards the high side) heat oil until hot. If using a thermometer let the temperature reach 375°. If you don't have a fancy gadget like most people, I always test my oil by dropping a few drops of water into it. You want it to sizzle and not pop too much. Adjust your heat if necessary. Using a fork or tongs remove cut chicken from milk mixture and place in the flour mixture. Seal and shake until nuggets are completely coated. Place about a 6-8 nuggets into hot oil and let them cook until golden brown, turning half way through once the edge of your chicken starts to turn white. About 1 minute each side. Always double check to see if any chicken you make is cooked through. I always just make a tiny cut to see if it's pink. Remove and drain on a paper towel. Repeat until all nuggets are cooked. Serve with your favorite sauce! I will let you in on a secret that only my bestest friends know...I ALWAYS eat my nuggets with honey! Always.

Thursday, January 19, 2012

Ketchup

I was going through our pictures and found some that we took on our impromptu visit to Utah. I am very happy to report that mom is finally home after almost 3 months of being in the hospital and rehab center. She is still recovering, but feeling SO much better!
These pictures remind me of the love that I felt from all of my family and friends that supported us in out time of need. Being an only child definitely has it's perks, but this was one time that I wished I had siblings to have shared the feelings I felt that I couldn't do anything for my mom. Now I know why Heavenly Father put the special people in my life that he did!

I flew out with Owen and then two days later Ian drove straight from Texas with Liam. He said Liam was a complete trooper and they enjoyed the time together.

Saturday, Utah got some snow and Liam got new boots, hat and gloves to celebrate! Owen was not interested!

We didn't take many pictures so I was surprised to see that Ian took this shot of the waiting room. It was our home away from home. My aunts (my mom's sisters) and my grandmother were always there to take care of my mom. They also gave the best help with our kids...as well as some of my wonderful friends. Food and entertainment was always provided!

And speaking of friends, we did get to spend a little time with some of them! I love the gang. My friend, Julie, was also a great support to me and I'm sad I didn't get a picture with her!

We ended up staying long enough that we were there for Thanksgiving. Because of the circumstances, it didn't really feel like a holiday to me, but I sure enjoyed the delicious food and company!

It's a tradition in my family to capture a picture of your children in front of the LDS temple you are married in. We needed some new pictures since Owen joined our family.

We left Utah 11 days later still not sure what was all going on with my mom. I had just prayed and hoped that it would all turn out positive...and it has! One great thing that did come from the whole thing is that I feel that much closer to my dad. He held on as best as he could with his spouse in such medical turmoil. I admire him for that.

I have such wonderful family and miss them all so much. Most everyone came to see my mom, take care of her, and just pour out their love for my family. I truly don't know what I would do without the love from my family and friends. I love them!

Wednesday, January 18, 2012

Lovely Winners!

I want to appologize for announcing the winners for the the adorable Adhering Words pillow slipcovers giveaway a day late. Our family has been battling the flu twice now and yesterday I was trying to get Liam's fever of 103 down all day yesterday. I hope all of your families are doing better than ours in the sick department!

So, here are the THREE winners...I ordered some for myself so I know you are as excited to get them as much as I am!

The winner for the LOVE pillow slipcover is...
Kacey @ Cooking With Kacey

The winner for the 14 pillow slipcover is...
Karla

And the winner for BOTH pillow slipcovers is...
Emily

Please email me with your mailing addresses and they will be shipped off to you shortly!
Congratulations to all three of you and thank you to everyone who entered!

Monday, January 16, 2012

Giveaway Reminder!

Don't forget about this fabulous giveaway that's closing today!
Your couches will thank you later!

Friday, January 13, 2012

Fabulous Food Friday #110

With all of my pregnancies, I am easily influenced when it comes to seeing food and wanting it right away. A commercial or a show and don't get me started on the Food Network!

A few weeks ago I was watching TV and I saw the most delicious crepes. Instantly the craving started and I knew it would not subside until I had some form of sweet crepes.

Now, I've only had crepes twice in my life. Once my freshman year in high school. I was taking French and our teacher gave a whole cooking lesson in French on crepes. They were delicious.

The second time was at my friend, Jamie's house for a church activity years ago. Luckily, I found her recipe in a neighborhood cook book that was also created years ago. Even though I haven't talked to her in forever...she still makes the best crepes (in my opinion)!

Crepes
Printable Version
Pin It
1 1/2 cups flour
1 TBSP sugar
1/2 tsp baking powder
1/2 tsp salt
2 cups milk
2 eggs
1/2 tsp vanilla
2 TBSP butter, melted

In a large bowl whisk together flour, sugar, baking powder and salt. In a small bowl whisk together milk, eggs and vanilla. Add to dry ingredients and beat together until well mixed. Heat a medium skillet over medium heat and melt butter. Add the melted butter to batter and combine. For each crepe, pour 1/3 cup batter into hot skillet and tilt the pan until you've created about a 5" circle. Cook until light brown (about 1-2 minutes) and then using a rubber spatula, flip over and continue to cook for another minute or until light brown. Serve warm.

*I filled mine with fresh berries and whipped cream, then dowsed them in powdered sugar. Other filling options can be jam, sour cream, pudding, or fresh fruit.